Cleaning your clearomizer vape is an annoying yet necessary task. Because over time, the wear and tear of the use of your vape will make it as dirty as can be. The results of intensive use over a week or two don’t lie. Decreased or burnt taste of e-juice flavoring, but also a poor vapor production in general. It’s clear that a good full clean of your device will increase it’s lifespan significantly.
For me, clearomizers are another step forward in the evolution of the e-cigarette. Unlike a cartomizer, they don’t need any filler material to soak up vape e-juice, but use a wick to feed the correct quantity of vape liquid to the atomizer. Clearomizers are getting increasingly popular within the vaping community lately, mainly due to the fact that they offer a “cleaner vape”. Let’s make that experience even cleaner by literally scrubbing the dirt out of your device and extend its life by days, if not weeks!
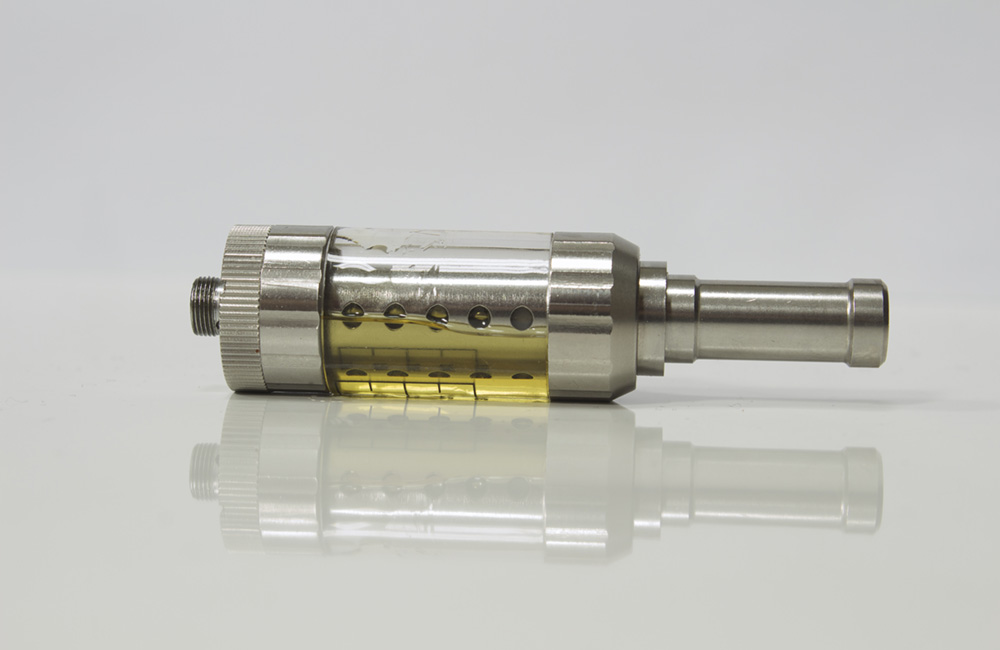
How To Clean Clearomizer Coils
If you have never cleaned vape components before, I’d recommend you to read these instructions slowly and carefully before starting the process. It’s easy to screw up a part of this process, which could potentially damage components or leave you with a clearomizer that’s still dirty. A full clean for a clearomizer vape coil can be successfully completed by following these simple instructions:
1. Remove excess gunk in the clearomizer
The first thing we need to do is to remove any materials or e-juice that might have built up over time in and around your device. Just like you would remove the tank to do a refill of your e-liquids. In order to do this, please follow these simple steps to get the first part of the job done:
·Unscrew the bottom base of the clearomizer (or top, depending on the device);
·Remove the coil heads;
·Dry and clean the coil heads with a paper towel;
·Screw the coil heads back to the base (make sure it can’t get loose).
When you experienced some serious flavor ghosting (getting a mix of e-juice flavorings all at once), try cleaning your tank with alcohol or lemon juice. It can also be helpful to use a small brush to scrub the insides of the clearomizer.
2. Wash and clean the clearomizer main tank
Now it’s time to do some cleaning with shower-temperature warm water. Fill up the main tube of the tank about 50% with this warm water. Put your thumb over the opening of the clearomizer tube and shake it hard for several seconds. Now let’s get rid of that dirty water and repeat until most of the dirt has gone. About 5 times should do the trick: This is important to improve flavors!
Some clearomizers have a sealing ring which you can lose while cleaning. Take extra care to not lose any components and keep everything in one place. After the washing process is completed, it’s key to let all the components you cleaned dry for at least 24 hours. Make sure everything is completely nice and dry before trying to re-attach the components again. But if you’re impatient like me you can speed up the process by blowing into the wet parts a few times and simply reattach when they look dry. The 24-hour air-dry process isn’t always necessary, but I don’t want you to mess up your components!
3. Refill vape juice and reassemble the clearomizer
Now that you’ve done the annoying bits where you clean all of the dirt out of your device, it’s time to reassemble the components back where they belong. But before we do that, there are two options we can choose from:
·We can continue the cleaning process with a dry burn to clean gunk off the coil (see below for instructions);
·Alternatively, we can fill up the tank with some freshly picked e-liquid of your choice;
Any through cleaning session would also require the steps described in the dry burn-process, so do check that out as well. If your coils are good, just skip that and move on with refilling your tank chamber(s) with e-juice. You can find the latest delicious e-juice flavors on this website. I tend to purchase mine from that website as well, so can confirm it’s all safe, and it’s a pretty fair price as well!
Let’s now screw the coil heads, as well as the bottom base unit to the main tube. In some vapes, it’s going to be a top base unit, but that’s an exception to the rule.
Dry Burn Coil On A Clearomizer
If you want to complete the cleaning process to the fullest extent and get a fresh feeling on your coils as well, it’s time for some serious dry burning action. This will clean the gunk and dirt on the coil(s) of the atomizer for you. It’s a delicate but quite simple process, so make sure to read closely while following the instructions:
·Start by heating your coil in 3-second bursts, until you see the coil glowing orange (make sure everything is relatively dry first);
·During the dry burn process, you’ll see sizzling of gunk vapor on the coil.
·If sizzling occurs, blow this away. Never blow into the clearomizer and onto the coil while you are heating it (it will break);
·Reheat a couple of times to remove all the gunk from the coils;
·You should start seeing your coils glow brighter orange. This means all gunk is burnt off;
·Let coils cool down and give it one last blow to clear everything out, and you’re ready to fill with e-juice and start vaping!
It’s pretty normal to get a weird mouth taste on the first few hits after doing this. A few hits later everything should be normal again. Also, please make sure to never blow in the wrong places as I explained, that will cause cracks and destruction of components. Please make sure to soak the coil for a while when doing the refill. Let’s look at that a little closer to make sure everything’s finished up properly.
How Long Should I Let My Coil Soak?
Before using a brand new coil or clearomizer, it’s essential to soak your wick from dry to completely soaked. How long you should wait for this soaking process to complete depends on the individual components, but you should at least wait 5 to 10 minutes for any type of vape coil to soak successfully.
This soaking process should also be used when cleaning and re-installing your clearomizers. It’s essentially as if you were to install a completely new component: Always let the wick adjust to its new surroundings. He’s a bit shy and needs to get used to its surroundings. My mates always tell me giving it some classical music and some encouraging words can speed up the process. But this is just an urban tale I heard on the streets.
Jokes aside, the soaking process should not be taking lightly: Skipping it or only partially soaking your wick might result in immediate coil burns, horrible taste and vape smoke, and is generally just dangerous to do. A responsible vaper should take the process into account when reattaching their coils, no matter the reason you switch that component up.
How Long Does A Clearomizer Last?
On average, a clearomizer will last anywhere from 3 to 14 days. How long your clearomizer lasts, depends on the intensity of use (known as chain vaping), voltage choice, and the e-juice flavor choices (which can cause gunk to build up around the wick). To prolong the lifespan of vape components, regular cleaning is encouraged.
Especially the choice of vape juice is important in making your vape components last longer:
·Sugary liquids with sweeteners create a faster wick build-up of debris and gunk;
·Tobacco liquids can also cause caramelization when too much heat is produced, depositing on the wick;
·High VG ratio liquids create thicker vape clouds, which strains the components faster causing burns.
Concerning the choice of voltage, higher ohm voltage for your coil can cause burns as well. It can also cause weakening of components of wick burn, which can potentially instantly kill your clearomizer. It’s, therefore, essential to be aware of the voltage choice: Always follow instructions provided in the instruction manual you got with your vape device purchase. I’ve also written a more detailed article on when vape coils need to be replaced. If you’d like to know more about that topic do check that article out as well.
Extending The Life Of Your Clearomizer
So now you know the full cleaning process for your most gentle components inside your vape gear. It’s actually quite fun after doing it for a while, at least from my personal experience. There’s a good reason to do proper cleaning, because you’ll certainly extend the lifespan of your components quite a bit. Your vape components will be thankful to get a second chance in life.
Choosing e-juices is an important part of increasing the lifespan of your clearomizers. But there are also a lot of cleaning gear options you can try out.